Reading Time: 6 minutes
In Part 1 of the series “Understanding Docker with Visual Studio 2017” I described what you need to prepare to get docker up and running on your Windows machine.
In this part 2 I´m going to explain how to use Docker with a .Net project using Visual Studio 2017.
I am going to describe each file, which is created by Visual Studio for the docker integration and what commands are executed by VS, when you start your application within a docker container.
At the end of this blog post you should have a better understanding about what Visual Studio is doing for you in the background and how you can debug a docker application using those tools.
I was working on a sample project called TalentHunter, which I put on github. I´m going to use that project to explain the steps. Feel free to download that project from my github page.
Adding Docker support
It is very easy to add docker support to your .Net project.
Just create a new web or console application using Visual Studio 2017 and then right-click on the web or console project -> Add -> Docker Support.
Voila, you have docker support for your project. That´s how easy it is!
By doing this, Visual Studio creates a bunch of files, which I´m going to explain here in more detail:
- dockerfile
- docker-compose.yml
- docker-compose.override.yml
- docker-compose.ci.build.yml
- docker-compose.dcproj
- .docker-ignore
Let´s look at each file and figure out what it contains.
dockerfile
FROM microsoft/aspnetcore:2.0 ARG source WORKDIR /app EXPOSE 80 COPY ${source:-obj/Docker/publish} . ENTRYPOINT ["dotnet", "WaCore.TalentHunter.Api.dll"] |
The dockerfile contains information, which is used when BUILDING a new docker image. It is NOT used when starting the container – this can be confusing, but it is important to understand the difference.
In the specific case above, the image is derived from the official microsoft image for Asp.Net Core 2.0. It expects an argument with the name “source” when the docker-compose command is executed.
It defines “/app” as working directory and exposes port 80 to the outside world.
When building the image it copies the content from the path specified in the source argument to the current directory within the container. If there is no source argument specified, the contents from the path obj/Docker/publish are used.
When the container is started, it will execute the command dotnet WaCore.TalentHunter.Api.dll to start the web application.
docker-compose.yml
An application usually consists of multiple containers (eg. frontend, backend, database, etc.), but to keep it simple I have only one container in this example.
The docker-compose.yml looks as follows:
version: '3'

services:
  wacore.talenthunter.api:
    image: herbertbodner/wacore.talenthunter.api
    build:
      context: ./WaCore.TalentHunter.Api
dockerfile: Dockerfile |
The concept of a docker service is to define the set of images, which are required to run an application. As already mentioned this simplified example has only one image, which is named herbertbodner/wacore.talenthunter.api.
The last two lines in the file define where the dockerfile can be found, which is within the subdirectory WaCore.TalentHunter.Api and is named Dockerfile.
docker-compose.override.yml
version: '3'

services:
  wacore.talenthunter.api:
    environment:
      - ASPNETCORE_ENVIRONMENT=Development
    ports:
      - "80"
networks:
  default:
    external:
name: nat |
This file completes the configuration information together with the docker-compose.yml file. It sets an environment variable ASPNETCORE_ENVIRONMENT and publishes port 80.
Next to that it also defines some basic networking configuration.
This docker-compose.override.yml file is used together with the docker-compose.yml (as we will see in a moment below).
docker-compose.ci.build.yml
If you have ever set up a traditional continuous integration/delivery pipline, you probably know that you usually have to install a couple of tools on your build server to enable a successful build of your application (e.g. build engine, 3rd-libraries, git client, sonar client, etc)
The idea of docker-compose.ci.build.yml file is to build an image, which has all necessary dependencies installed and are required to build your application. This means, that we can also create a Docker image for our build server.
However, we are not going to make use of this file in the remainder of this blog post, therefore it is out of scope. Just keep in mind that you can also dockerize your build server like this.
docker-compose.dcproj
This file is the project file for docker and contains relevant information for docker, like the version, where to find the configuration files etc.
.docker-ignore
* !obj/Docker/publish/* !obj/Docker/empty/ !bin/Release/netcoreapp2.0/publish/* |
The .docker-ignore file contains a list of files, which should be ignored by docker.
As you can see in the file, everything is ignored (indicated by the *), except the three folders indicated in the last three lines.
Running the application with Docker
You can easily build an run the application by setting the docker-compose project as the startup project and hitting F5, or by right-clicking the docker-compose project and selecting “Build” in the dropdown menu.
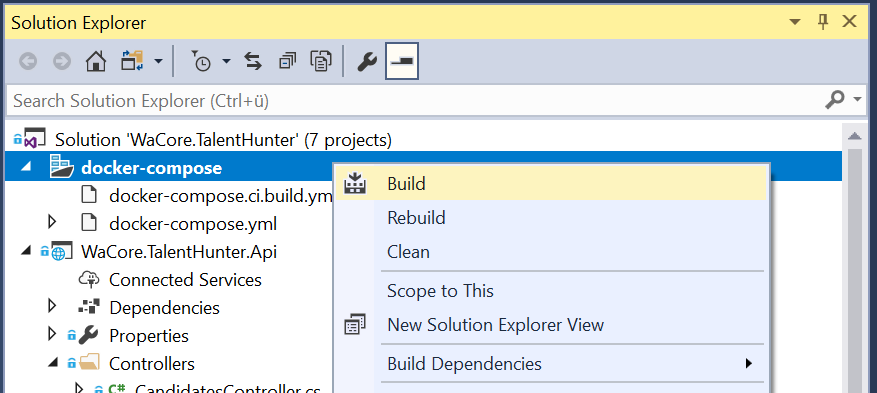
When you run the docker-compose project you will see in the output window (build section) the commands, which are executed by Visual Studio.
There are some commands, which are important in general, but not so important in order to understand what is going on. For instance, there are some commands to check, whether the container is already running and if so, the container is killed etc.
“docker-compose up” command
Nevertheless, the important command, which is executed by Visual Studio when hitting F5 is the docker-compose up command with the following parameters:
<strong>docker-compose</strong> <strong>-f</strong> "D:\_repo\TalentHunter-Api\src\<strong>docker-compose.yml</strong>" <strong>-f</strong> "D:\_repo\TalentHunter-Api\src\<strong>docker-compose.override.yml</strong>" <strong>-f</strong> "D:\_repo\TalentHunter-Api\src\obj\Docker\<strong>docker-compose.vs.debug.g.yml</strong>" <strong>-p dockercompose9846867733375961963 up</strong> -d --build |
The docker-compose up command builds an image and starts the container.
Let´s have a closer look to the command and it´s parameters:
The -d and –build parameters at the end indicate to start the container in detached mode and force a build. The -p parameter gives it a certain project name.
Then there are three configuration files specified with the -f parameter: docker-compose.yml, docker-compose.override.yml and docker-compose.vs.debug.g.yml.
All of them together contain the information on how to build the docker image. We already looked at the first two files a moment ago. The last configuration file (docker-compose.vs.debug.g.yml) is generated by visual studio itself and it is different depending on the build mode (debug or release).
In release mode a file named docker-compose.vs.release.g.yml is created, while in debug mode the file docker-compose.vs.debug.g.yml is used.
So let´s have a closer look at those two yml files and see the differences.
docker-compose.vs.release.g.yml
version: '3'

services:
  wacore.talenthunter.api:
    build:
      args:
        source: obj/Docker/publish/
    volumes:
      - C:\Users\hb\onecoremsvsmon\15.0.26919.1:C:\remote_debugger:ro
    entrypoint: C:\\remote_debugger\\x64\\msvsmon.exe /noauth /anyuser /silent /nostatus /noclrwarn /nosecuritywarn /nofirewallwarn /nowowwarn /timeout:2147483646
    labels:
..... |
When you build your application in Visual Studio in release mode, then two main things happen:
First of all your application is built and the build output is copied to the output folder “obj/Docker/publish/“.
Then your container is built using the docker up command with above configuration file docker-compose.vs.release.g.yml. In the configuration file you can see the build argument source, which points to the same folder, where the build output of our application is (“obj/Docker/publish/”). This argument is used in the dockerfile to copy all the content from that folder to the docker container (check again the code in the dockerfile, which we had a look at a moment ago).
On top of that a volume mount is created to the debugging tool msvsmon, but I´ll dive a bit deeper into that in a second.
docker-compose.vs.debug.g.yml
When you build your application in Visual Studio in debug mode, then the docker-compose.vs.debug.g.yml file is created by Visual Studio and used as an input to build the container. That configuration file looks as follows:
version: '3'

services:
  wacore.talenthunter.api:
    image: herbertbodner/wacore.talenthunter.api:dev
    build:
      args:
        source: obj/Docker/empty/
    environment:
      - DOTNET_USE_POLLING_FILE_WATCHER=1
      - NUGET_PACKAGES=C:\.nuget\packages
      - NUGET_FALLBACK_PACKAGES=c:\.nuget\fallbackpackages
    volumes:
      - D:\_repo\TalentHunter-Api\src\WaCore.TalentHunter.Api:C:\app
      - C:\Users\hb\onecoremsvsmon\15.0.26919.1:C:\remote_debugger:ro
      - C:\Users\hb\.nuget\packages\:C:\.nuget\packages:ro
      - C:\Program Files\dotnet\sdk\NuGetFallbackFolder:c:\.nuget\fallbackpackages:ro

    entrypoint: C:\\remote_debugger\\x64\\msvsmon.exe /noauth /anyuser /silent /nostatus /noclrwarn /nosecuritywarn /nofirewallwarn /nowowwarn /timeout:2147483646
    labels:
.... |
While in release mode the application build output is copied to the docker image, in debug mode the build output is not copied to the image. As you can see in the configuration file above, the source argument points to an empty directory (“obj/Docker/empty/”) and therefore nothing is copied by the docker-compose up command to the docker image.
So what happens instead?
Well, instead of copying the files, a volume mount is created to the application project folder. Therefore the docker container gets direct access to the project folder on your local disk.
In addition to the project folder, there are three other volume mounts created: two mounts to give the docker container access to the NuGet packages, which might be necessary to run the application. And another mount to the folder, which contains debugging tools.
Let´s have a closer look at how debugging works with docker containers.
Debugging the application running in Docker with Visual Studio
As already mentioned, a volume mount is created from the image to the folder “C:\Users\hb\onecoremsvsmon\15.0.26919.1\”. That folder contains the debugging tools, which come with Visual Studio.
When the container is started, then the msvsmon.exe file is executed on the container as well, because msvsmon.exe is defined as an entrypoint in the docker-compose.vs.debug.g.yml file (see above).
Then msvsmon.exe is interacting with Visual Studio and therefore we are able to set a breakpoint and debug the code as we wish.
If you want to know more how Visual Studio 2017 and Docker are working together, then I recommend following Pluralsight course: “Introduction to Docker on Windows with Visual Studio 2017” by Marcel de Vries.
I love Pluralsight and if you are looking for a source with condensed information prepared in a structured way for you to consume, then I urge you to look into https://www.pluralsight.com
CloseUp
In this post we saw how easy it is to add docker support to a .Net Core project using Visual Studio 2017.
Then we looked into all the different files, which are created automatically to figure out what they are used for.
Finally I explained what is happening in the background when you build a docker project with Visual Studio 2017 in release mode as well as in debug mode.
Now, I hope this getting-started-guide helps you to set up your own projects using docker. Let me know if anything is unclear or if you have any questions.
That´s it for today. See you around and HabbediEhre!
Excellent article. You have an unambiguous writing style that limits the question, “What does he mean by that? The required infrastructure for adding dockers to an existing application raises a lot of questions. I am glad you answered some important ones. Thanks!