I talk extensively why you should migrate from Team Foundation Version Control (TFVC) to Git in my guest post at simple programmer, which will be published soon. In this post I am going to explain the more technical procedure on how you migrate from TFVC to Git.
But before I will describe the five migration steps in detail, I would like to give you a short introduction why this whole topic even matters.
Why Migrating To Git
Many teams are using Team Foundation Server (TFS) to support their software development process. There are a lot of features included in TFS, like source control, build server, work item tracking, reporting—basically all the features that are necessary for a professional team to develop software.
TFS also supports two types of source control systems, which are Team Foundation Version Control (TFVC) and Git. While TFVC was supported since the first version of TFS, Git has been added in TFS 2013.
Many software projects have been started before 2013 and therefore are using TFVC. And although there are many benefits when using Git, people who started with TFVC did not migrate yet. They didn’t want to invest the effort.
Here I would like to show you that the migration is quite straightforward compared to the effort you might imagine for such a project.
TFVC to Git is quite easy
Each project in TFS is organized in so called Team Projects, which is the container for a repository, the builds and the work items.
The great news is that you don’t have to create a new Team Project when you migrate to Git. You can create your new Git repository in the same Team Project. This means that a TFVC and a Git repository can live side-by-side in the same Team Project.
This also means, that you don’t need to migrate your work items, your backlog or your kanban boards. You can keep using them the same way as your team is used to.
Even the builds can basically stay the same. Of course, you have to modify them slightly to pull the source code files from the new Git repository instead of the TFVC repo, but the rest of the build steps don’t require any difficult modifications.
Another fact that works in your favor is that we can migrate the whole commit history of the TFVC repo to the new Git repo. Even though there are some rumors that you are able to migrate only the commit history of the previous 180 days (see here), this is not true. You can migrate the whole commit history from your TFVC repository to the new Git repo.
Ok, now let’s see how this migration can be done.
TFVC to Git Migration Steps
You simply need to go through the following five steps to migrate your TFCV repo to Git.
Step 1: Install git-tfs
There are multiple tools to migrate from TFVC to Git. The one with the most features and the best support is git-tfs. You can find some download and installation instructions of git-tfs here.
When you have Chocolatey installed, then you simply need to run following command:
choco install gittfsStep 2: Export to local Git Repo
After you have installed git-tfs you can run following command to connect to your TFVC repository and clone it into a local Git repository.
git tfs clone http://your-tfs-server:8080/tfs/your-collection $/your-tfvc-repo --export --export-work-item-mapping=C:\temp\git_migration_mapping.txtThis command creates a new local Git repository in your current folder. It migrates all files including the whole changeset history of your TFVC repository your-tfvc-repo to your Git repository.
Let’s have a more detailed look at the parameters of the “git tfs clone” command from above.
Migrate associated work items
By default the associated work items in a changeset are not migrated to Git. However, as we don’t want to lose any information while migrating, we would like to have this info in the commit messages of the new Git repository as well.
Therefore we can use the parameters “–export” and “–export-work-item-mapping={mapping-filepath]”. With the latter parameter you specify a file, which contains a mapping of work item ids.
The work item mapping has been implemented for the scenario when you want to migrate from one Team Project to another. In such a case you also migrate your work items to the new Team Project.
During the work items migration the work items get copied and re-numbered in your new Team Project. With the mapping file you can tell the tool how to map the old work item ids to the new work item ids.
In our case we don´t want to migrate to a new Team Project, but stay in the same. Therefore the work item ids stay the same as well. So our mapping file is quite simple:
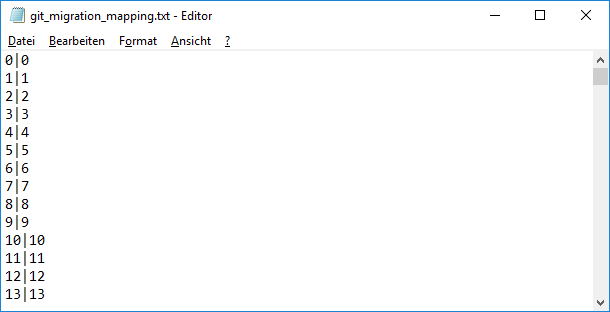
As you can see, we map work item with id 0 to work item 0. Work item 1 is mapped to 1, etc.
My list goes up to 100000, and it will work as long as I don´t have more than 100000 work items in my Team Project.
Finally, our migrated commit messages will look as follows:
This is my original TFVC commit message.
Workitems: #9764
git-tfs-id: [http://my-server:8080/tfs/my-collection]$/my-team-project;C35615
As you can see in this example it also contains the information that this commit is linked with the workitem #9764. So you also have migrated the information about associated work items from your TFVC changesets to the Git history.
Wait for some time…
When you run the “git tfs clone” command with the parameters from above then it will take a while until the new Git repository has been created. The tool has to go through every changeset of your repository and build up the history for the new a Git repo. For me this took about 2.5 days to migrate all information for a single TFVC repository.
If you have additional requirements, for instance you have multiple branches, then this is supported by git-tfs as well. You can find more information in the documentation.
Ok, now we have created a local Git repository. The next step is to manually tidy it up a bit.
Step 3: Cleanup New Git Repository
You can remove the information about TFVC source control binding from your solution. Then you add a .gitignore file.
DELETE .VSSSCC AND .VSPSCC FILES
Each solution file (.sln) should have a .vssscc file, which contains source control binding information. Simple delete all of the *.vssscc files, we don´t need them anymore.
Similarly, each project file has a .vspscc file, which is not necessary and can be deleted as well.
EDIT SOLUTION FILE
Then you make a small edit to the solution file. Therefore open the .sln file in your favourite text editor and remove all the text between GlobalSection(TeamFoundationVersionControl) … EndGlobalSection.
This removes the information about the connection to the TFVC repository.
CREATE GITIGNORE FILE
Finally you create a .gitignore file. This file tells git, which files it should not monitor for changes, but simply ignore. It is a text file containing a list of files or pathes, which git shouldn´t monitor.
I created a new project in Visual Studio using one of the default project templates and from there I copied the .gitignore file. This is a good starting point, because it excludes many of the files, which we don’t want to have in our repository. For instance, the build output in our Debug folders or user-specific files, like the .suo or .user files.
Ok, now we have a clean Git repository. The next step is to make the local repository available to our team members by pushing it to TFS.
Step 4: Create new Git Repo in TFS
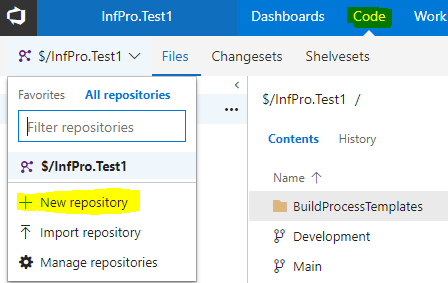
First of all we create a new, empty Git repository on our TFS server, of course within the same Team Project. Therefore open the “Code” tab of your Team Project in the browser and click “New repository”.
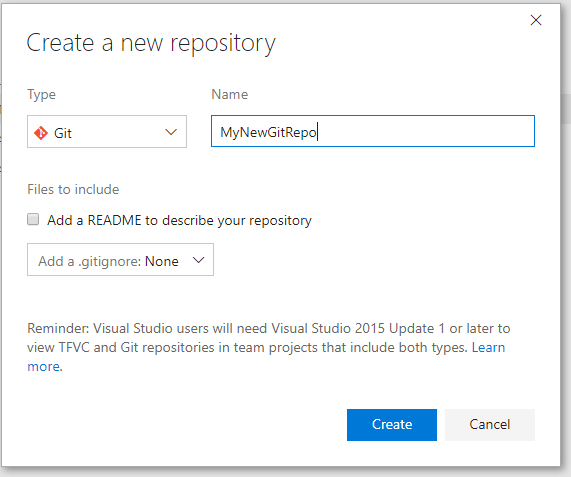
Then specify a name for the repository and click “Create”.
Don´t add a README and don’t add the .gitignore file at this point. We already have a gitignore file and we can always add a README file later. By skipping these steps here you avoid some conflicts in the next step.
Now you have created an empty Git repository on your TFS.
Step 5: Initial Commit to Git Repo
Ok, at this point you have a new, empty Git repository on your remote and a migrated Git repo on your local machine. Now let´s link these two together and push everything to the Git Repo on your TFS.
First of all change into the root directory of your local repository. Then you begin adding all files to the staging area and finally you commit all changes to your local repository.
git add .
git commit -a -m "initial commit after migration"
Then you add the Remote repository by specifying the URL to the remote Git repo you created on the TFS earlier. You can find the URL in the webpage of the newly created Git repository on your TFS server.
git remote add origin https://your-server:8080/tfs/your-collection/your-team-project/_git/MyNewGitRepoFinally you push all your local changes to the Remote.
git push -u origin --allVoila, you have now migrated your TFVC repository to a new Git repo!
Now the only task let is to lock your TFVC repo to make it readonly. When you officially switch to Git, then people shouldn’t be able to commit changes to the old TFVC repository anymore. They should only commit to the new Git repo.
Next steps
Now you have a new Git repo and from a technical point of view you are ready to switch to Git.
However, from a organizational point of view there are a couple of more steps required. You have to teach your team how Git actually works. There is quite a difference compared to TFVC, but when you get your head around some concepts, Git is quite easy.
A great tool to teach your team the concepts of git is http://git-school.github.io/visualizing-git/.
With this tool you can easily explain how commits are always linked to a parent. You can also show that a branch is just a pointer to a specific commit, how tags work, what the HEAD pointer is, how to push/pull from/to the origin, etc.
When people understand these concepts, then the rest is quite easy to grab.
Ok, that´s it for today.
If you have any specific questions or insights about the migration from TFVC to Git, then please let me know in the comments.
Take care and HabbediEhre!
Hello Herbi,
Thank you for this tutorial. I’ve been going through it to migrate an old TFVC repo to GitHub, eventually. I’ve finished all 5 steps, but I’ve got a big question. The app originally had several DLLs in it. Looking at the new Git repo in our local TFS, I see all those DLLs still there. Yes, there is a .gitignore file at the root level of the Visual Studio project, but I’m still bothered by the fact that the DLLs exist. Your tutorial didn’t mention getting rid of those DLLs, before pushing them to the TFS remote. Should I have? Or is it the case that when I eventually push this new repo to a GitHub repo, that those DLLs will be removed?
Hi. I’m evaluating the migration from TFSVC to Git on a large solution with branches. Actually I have TFS 2018 and VS2019. The git-tfs project seems abandoned some years ago, so, I don’t know if that tool will work in my current environment. Anybody have tested this scenario? Thanks.
Hi,
We did the migration with TFS 2017 (VS version is unimportant). Git-tfs does not seem to have any active development going on, but worked fine for us.
We want to migrate from work items, queries, and other board items of TFS 2012 server into Azure DevOps. Could you please explain?
you said this “With the latter parameter you specify a file, which contains a mapping of work item ids” how did you get the mapping between old work item ids and your new work item ids? does the –export parameter create links between commit and new work items? or should I need to do something to map work item ids between old and new repo?
I don’t know how to get that mapping values file .
It would be very helpful if anyone can describe a process to get that mapping value file.
Thanks, regards.
Hi David,
The git repo I created here was uploaded/connected to the same TFS project collection as the TFVC project. Therefore the work item ids are the same!
That’s why you only need a very simple mapping as indicated in the “notepad” screenshot above.
What’s your scenario?
HTH
Herbi
It took you 2.5 days to migrate from TFVC to Local Git, then how much time it took to move from Local to Remote ?
Million Thanks.
Just a small correction about your statement
….previous 180 days (see here), this is not true….
If you refer to the documentation in the URL you mentioned, it clearly states 180 days limit. It’s official.
But that’s a small oversight.
Rest works like charm.
Hi Abhijit,
well, yes, this limitation indeed is documented there, but I didn’t run into that issue during my migration. I was able to migrate the WHOLE commit history, which is around 9 years of commits…
Thanks for the feedback,
Cheers
To clear up the misunderstanding: the mentioned 180 days limit only applies if you use the migration tool that is built-in in TFS. If you use git-tfs, as in this post, there’s no such limitation.
Thanks for clarifying this, Kerem!